Thursday, December 16, 2010

What's the Real Story with Word's Comments and WriteRAP?

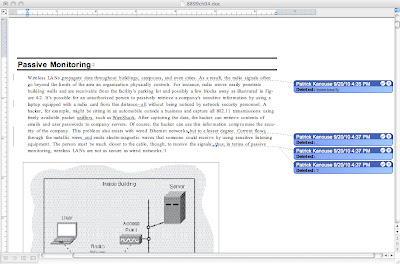
Word's Comment and Tracked Changes functions are widely used and relied-upon in our editorial processes, and they can be used in WriteRAP the same as in any Word document. We use them particularly because (as of Word 2002) they allow us to insert comments and track our changes without affecting the flow of the text.


However, there is a limitation to both these tools that we tend to overlook but which becomes apparent when used in a high-fidelity WriteRAP Word document: they do not entirely avoid reflow. When a comment or tracked change balloon is inserted in a document, Word creates a fake extended page margin to allow extra space to fit the balloon in... but it also expects to use space within the actual page margin.


When the page margin is already generous, we don't notice that this has happened, but it does happen, every time. And if the page margin is not generous -- if the design is "tight" -- then leaving comments and tracked changes visible will cause text reflow. The reflow clears itself up when the view is changed to show only final text (without the balloons), but if the balloons are showin', the text is reflowin'.


So while the use of track changes and comments is encouraged, just be aware of the this consequence.

Thursday, December 9, 2010

WriteRAP 1.4 Released 12/9/2010

WriteRAP version 1.4 has been released on the USA WriteRAP server today, 9 December 2010. Most of the enhancements are ones that will benefit administrators and super-users of the system, though a few will improve life for all users:
  1. There was a bug in the handling of projects whose project admins/project managers had been removed from the WriteRAP system. The bug is fixed in this release.
  2. Documents in WriteRAP are added to a parsing queue upon sign-in; the documents are parsed to ensure that they are not corrupted. But documents in archived projects do not need to be parsed. This release removes those documents from the parsing queue.
  3. Similarly, documents that have no template assigned do not need to be parsed. This release also removes those documents from the parsing queue.
  4. Temporary folders and files build up on the WriteRAP server just as they do on any computer. This release removes them automatically.
  5. Some actions that are available for documents in active projects should not be available in archived projects. In this release, those actions are disabled in archived projects.
  6. Upon export of document(s), the user can now choose to have all documents that are being exported placed under administrative lock automatically.
  7. This release fixes a bug and a usability issue concerning workflow status -- the status can now be set and will be properly maintained until it is explicitly changed.
  8. WriteRAP system administrators can now update notices on the welcome page using a web-based interface, rather than by logging on to the WriteRAP server itself.
  9. Users can now choose to sign-out and download multiple documents simultaneously; likewise, they can upload and sign-in multiple documents simultaneously.
  10. WriteRAP administrators sometimes work with the Template Manager window, which lists a large number of templates. Previously, any action an administrator took in this window would cause the view on the window to return to the very top of the full list of templates, requiring the administrator to re-navigate to the point of interest in the list; this release leaves the view unchanged, thus making it easier to work in the list.
  11. In this release, administrators can quickly toggle between a project page and that project's document list page.
  12. A report of documents that failed to parse is now available in the reports page.
There is no update to the WriteRAP toolbar at this time.

Thursday, November 4, 2010

What About that Image Library Thingie?

WriteRAP provides a variety of tools and efficiencies to streamline the authoring process. One of these is the Image Library, and in this post we'll clarify what this tool is, what it does, and what it doesn't do.

The Image Library is a project-based repository on the WriteRAP server that can store jpegs or gifs for use within a WriteRAP document. It contains one folder for each chapter and a folder for common art for the project. These folders are autogenerated when a project is created or a document is added to a project.

The BatchXPort Pro extraction process automatically generates jpegs that can be uploaded to the Image Library by your vendor.

These images can be placed by the user using the Image Library button on the WriteRAP toolbar, although an online connection is required. An image placed using the image library will retain its name when the file is exported, whereas the native Word picture insertion mechanism will strip the name from the image file.

Do you need an Image Library?

Well, probably not. Other than this potentially useful image name in the export, WriteRAP offers conveniences, but an Image Library is not a required part of the WriteRAP process.

  • It can offer the convenience of viewing art in pages, and significantly add to the visual environment. It could allow an author to provide low-resolution art to be placed by the vendor or development editor.
  • Using a low-res image will allow editing of captions in context.
  • For technical books and books relying on screen shots, the availability of the art can be crucial to the authoring/editing process.
  • The author can mark broad changes to art within the WriteRAP manuscript. However, detailed art development is still probably best handled with a separate art manuscript.
Cautions:

  • A lot of art will increase file size. There is still a risk of server error, document corruption and slow upload/download times if files become ungainly.
  • For the foreseeable future, WriteRAP neither helps nor hurts art program management. It is not currently integrated with other systems, and the timing of manuscript development in WriteRAP often does not coincide with art program development.
  • It is important to realize, also, that a vendor may place art without using the image library, and have other methods for getting art references into the XML code for paging.
  • Some cost is incurred by using the Image Library.

Using the Image Library is a project-by-project decision, and one you should discuss with your team to determine if there is a potential benefit.

Tuesday, November 2, 2010

Word Tips 3

This set of Word tips focuses on working with tables.

Move a Row Within a Table
You've probably tried to move a row within a table in Word, and you've probably done it this way: add a row through the Table > Insert menu. Copy and paste the old row into its new location. Delete the old blank row. If that's how you've been doing this task, you'll be glad to know there is an easier way:
  • Put your cursor in a cell of the row you want to move.
  • Hold down the Alt-Shift keys (on Windows) or the Ctrl-Shift keys (on Mac) and use your up-down arrow keys to move the row.

Add a Line Before a Table
Anyone who has worked in Word knows that once you've started your document with a table, it seems impossible to get a line of text above that table. But there is a way:
  • Put your cursor in a cell of the top row of the table.
  • Hold down the Ctrl-Shift keys and press Enter (on Windows) or hold down the Option-Shift keys and press Return (on Mac).
  • A line for text will appear above your table.

Split a Table
Once you have had two Word tables glued together, or if you decide to split a single Word table, how do you do it? Or have you decided it can't be done? It can, like this:
  • Put your cursor in a cell of the row that you want to become the first line of the second table.
  • Hold down the Ctrl-Shift keys and press Enter (on Windows) or hold down the Command (Apple)-Shift keys and press Return (on Mac).
  • The table will split above your cursor..

Thursday, October 28, 2010

Getting Ready for Pages

Get the most out paging from WriteRAP

Tiers 2-3: You have been using WriteRAP for structuring your content. Have your vendor ensure the styling in your content documents is correct to ensure good first pages in InDesign or Quark. Unlike keyboarded markup, you have an opportunity to see style errors visually and quickly and correct them before the compositor has to.

Tier 4: You are using WriteRAP for its structure and for a visual representation of first pages. You can take the structured content and go to first pages in InDesign, as above, but you can streamline your workflow by treating the WriteRAP file as first pages. Proofreading, editing and revisions can all be done in the MS Word environment! When the content is solid and as final as you can get in WriteRAP, you can finalize the chapter, move elements into their final position and make page breaks, or mark all of these for your vendor using comments or editorial notes.

The fewer content changes you have to make in composition, the smoother and quicker your composition passes will be. A quick proofreading pass to ensure the integrity of the content would take place, but the compositor can now focus on making good pages rather than correcting typos or sorting out a knot of marginalia on a single page. Remember that content changes in composition need to be made in the WriteRAP file as well, or logged for the next edition.

Tier 5: You are using WriteRAP and Word as the composition engine. You want to forget that Word is your composition engine as you go through the authoring-editing-proofreading-review cycle. Finalize your content in a template-driven, manuscript-like environment and then turn off Word's format protection and compose the pages when the content is final.

Because of the possibility of a slightly different representation in different versions or instances of Word, final review should be done in PDF format.

Tuesday, October 26, 2010

Vendor Refresh Training: Part 2

On the afternoon of Thursday, October 21st, we had the second installment of the refresher training. In that particular training session, the following vendors attended:

  • GEX
  • Progressive
  • Carlisle
  • Prepress
  • Juve
  • Element

Thursday, October 21, 2010

It’s Time to Get Some Training! (Part Deux)

You may remember that last month, we talked about what to do when you needed to sign up for training. We’re pleased to announce that the new self-paced courses have been released both to the Pearson People Development Network, as well as into our Pegasus system (for external users such as authors or vendor contacts).

The courses have been revamped, rebuilt, and are more focused on specific skills used within WriteRAP. There are six new courses:

Getting Started – Getting Started focuses on logging in and out of WriteRAP and changing and recovering passwords.

Document Management – Document Management focuses on finding projects and documents, previewing documents, and uploading and downloading documents.

Toolbar Basics – Toolbar Basics focuses on opening a WriteRAP document and the toolbar, applying and removing character formatting, working with basic formatting, and applying and removing styles.

Boilerplates – Boilerplates focuses on downloading and opening the Boilerplates Library, inserting and editing boilerplates, working with common boilerplates, and cleaning up styles.

Basic Pagination – Basic Pagination focuses on repositioning boilerplates, resizing and deleting boilerplates, and breaks.

Advanced Pagination – Advanced Pagination focuses on finalizing pagination and the WriteRAP Library.

These courses are all self-paced, and include self-paced modules, job aids, a lab, and an assessment.

If you’ve already taken some training and are just looking for a little remediation, these course can provide that. You can also visit the CMS Website and peruse the Job Aids, which cover sets of skills for each course and can help you brush up on specific things as opposed to re-taking an entire training course.

Pearson People Development Network

Tuesday, October 19, 2010

Vendor Refresh Training: Part 1

This morning, we conducted the first vendor refresh training. Among the items we covered:
  • Updates to the toolbar (Boxes macro, cleaning up Char styles, etc.)
  • Updates to the interface (multiple document upload, packaging, etc.)
  • Simplify templates so that they are usable
  • Verify templates to the tagging guidelines
  • Use of the QA checklist
The vendors at this refresh training were:
  • Aptara
  • Glyph International
  • Integra
  • Lapiz
  • Laserwords
  • MPS Limited
  • PreMediaGlobal (PMG)
  • S4Carlisle
Domestic vendors are scheduled for a similar session later this week.

We'll have an additional session later this week. The goal of this refresh training is to baseline all the vendors and Pearson in the knowledge we have to date for creating templates and working with WriteRAP projects.

We will follow up on these efforts with a monthly vendor forum to address any new issues, updates and questions that arise.

Thursday, October 14, 2010

When the Toolbar and Boilerplates Don't Want to Load on the PC

We had an issue where a person was loading the WR toolbar for the first time on the PC, but was getting errors. Upon loading the WR toolbar off the website there was an error that opened a pop-up and then sent the toolbar document to the C: / Temp folder. All his office applications were turned off, as one is supposed to do. You could still activate the toolbar through Tools and Add-Ins, but this is merely a workaround that hides the issue and ultimately won't help.

Later they had a WR document open and wanted to load the boilerplates. We click Load boilerplates and get an error that is something like:

"Error #5 Invalid call or procedure"
...And no boilerplates load.

Here is more information on the computer with the problem: Windows running XP Pro version 5.1.2600, Service Pack 3.0

It turns out that these two errors are connected. Something was missing on their PC that most computers already have. The 0xc0000135 error ("The application failed to initialize properly") indicates that his .NET framework is bad or not installed at all. One should install Microsoft .NET Framework from http://www.microsoft.com/downloads/en/details.aspx?FamilyID=0856eacb-4362-4b0d-8edd-aab15c5e04f5&displaylang=en> . One should install at least version 2.0.

This code should have been installed with Service Patch 2 years ago, but maybe it was missed on his machine. Every Windows machine needs to have .NET installed; there are just too many programs these days that depend on it and assume its presence.
Keep this in your bag of tricks should this happen to someone else.

Tuesday, October 12, 2010

Vendors! Update

Who has been certified, and who hasn't? What have they been certified for?

First, a few words of caution: Part of WriteRAP is about experience - and we are all gaining experience, even or especially the vendors. The best-trained vendors still may need help when they first start live work in WriteRAP, or take on a task or workflow they have not yet encountered.

Also, projects are unique, and WriteRAP is very flexible, so be sure your vendor is clear about expectations for your particular project.

yes


VendorExtractions Styling Template
Build
Project
Mgmt
Overseas/
Domestic
Partner

Aptarayesyesyesyes

ElementTrained, not yet certified

GEX, Inc.yesyesyesyes

IntegrayesyesyesyesBookmasters,
Elm Street

JouveyesyesyesTexTech

Laserwords yes yesPine Tree

Macmillan Publishing
Solutions (MPS)
yesyesyesyes

Premedia Global (PMG)yesyesyesyesGGS, Prepress

S4Carlisleyesyesyesyes

Bookmasters yesIntegra

Carlisle yesS4

GGS yesPMG

Pine Tree yesLaserwords

Prepress yesPMG

Progressive yesIntegra


Who is being certified?
Currently training in template building: Progressive, Juve
Scheduled for all processes: Juve, Element

Thursday, October 7, 2010

WriteRAP Image Library

WriteRAP includes two features for inserting images into a WriteRAP document: Insert Local Image (only available on Windows), and the Image Library. Both these features allow the insertion of an image while retaining the image name in the output, something Word would not naturally do on its own. Note the information box containing the image name that appears in the screenshot below, where the cursor is hovering over the image.


Other than this potentially useful line of code, WriteRAP offers no additional art program management. In addition, all limitations of artwork within Word apply: if your author uses Local Image to include a photo (instead of Word’s Insert Picture from File), the original high-res photo must still be supplied separately.

It is a project decision as to whether or not to use an image library. Some things to consider are:

Positives

  • If your extraction was done using BatchXPortPro or BatchXSLT, jpeg files are automatically generated and are available without further conversion.
  • Using a low-res image will allow you to editing of captions in context.
  • For technical books and books relying on screen shots, the availability of the art can be crucial to the authoring/editing process.
  • The author can mark broad changes to art within the WriteRAP manuscript. However, detailed art development is still probably best handled with a separate art manuscript.

Cautions

  • A lot of art will increase file size. There is still a risk of server error, document corruption and slow upload/download times if files become ungainly.
  • For the foreseeable future, WriteRAP neither helps nor hurts art program management. It is not currently integrated with other systems, and the timing of manuscript development in WriteRAP often does not coincide with art program development.

Tuesday, October 5, 2010

WriteRAP and Documentum

We are beginning to look at the potential integration of WriteRAP and Documentum. We're still some time away from knowing the full scope and details, but your Structured Authoring team is on the task.

Never heard of Documentum? Well, you will. If you are a Pearson employee, check out some Documentum info here.

Be on the lookout for more information in the future about what an integration means and how it will increase efficiency and ease collaboration.

Tuesday, September 28, 2010

Template Library: Feedback?

Now that the Template Library has been up for a while, and we are revisiting it's construction, is there anything that you would like to see changed? No promises, but we are listening. You can email us with any thoughts and suggestions.

Friday, September 24, 2010

WriteRAP 1.2.1 Patch Release

A recent discovery regarding downloads on archived projects has prompted a swift patch implementation. We’ve decided to add a couple of things to the patch to assist with some user experience difficulties as well.

The patch fixes the following (apologies for the techie-ness of some of this, but several of the items are not functions the user usually directly interacts with):
  • Deleted User handling - when a user is deleted, all occurrences of the deleted user name in all tables of the database will be replaced by 0, to prevent discrepancies and out of synch data.
  • Stop Parsing Archived Files - this fix will prevent the files belonging to an archived project from entering in to the parsing queue. The resolution to this is such that the document list page of archived projects would include only functions that are needed - functions such as parse, delete document, add new document, move, lock document, document version are all removed from that page.
  • Stop parsing documents that adopt NO-TEMPLATE - such documents will no longer enter the parsing queue, which should assist in eliminating parsing queue issues associated with NO-TEMPLATE documents that lack the clean CHAR styles macro.
  • Delete temp download folders - this remedies the clean-up mechanism of temporary file.

Tuesday, September 21, 2010

Track Changes and WriteRAP


One of the great things about using Word to write text is that editing can take place wholly electronically andyou can easily track changes using Word's, well, Track Changes feature (formerly called Revision Marks for those of you who remember Word pre-Word 2003).

The good news is that you can still use Track Changes with WriteRAP documents.

One of PTG's process basically consists of this:

Authoring -> Development -> Tech Editing -> Copy Editing -> Author Review (AR) -> AR Approval -> Clean Up of Files -> 1st Pages -> AR of 1st Pages -> 1st Pages Clean Up -> Composition

A couple of notes about this process:
  1. During the "Clean Up of Files" stage, the track changes are removed and the document is reviewed for style (i.e., body text is styled CHAP_BM) correctly.
  2. During the "1st Pages" stage, the text still is in Word, styled to the template. In essence, the "Clean Up of Files" stage leads directly to "1st Pages." The goal of this stage is to give the author full access to the content to make updates at minimal expense while still getting an idea of how the final pages will look. Later pages during the composition stages are reviewed for design and hardcopy integrity.
Obviously, this particular workflow works best for tier 4 titles, but all tiers can benefit from using Track Changes. A couple of things to watch for when working with Track Changes in WriteRAP:
  • Lots of changes will wrap text, etc., in the view, so you won't have a representation of the page until they are cleaned up (or you elect to view the final version of the document--in the Track Changes toolbar, you choose Final [other options include Final Showing Markup, Original, and Original Showing Markup]). This is why 1st pages in the process outlined above does not occur until after the copy edit markup has been cleaned up.
  • With floating box structures, watch out for their anchor points, for when cleaning up Track Changes, it is easy to unwittingly delete the anchor point...and thus the box.

Friday, September 17, 2010

What Tier Should My WriteRAP Project Be?

One of the first steps in selecting a project for WriteRAP is to make the decision about in which Tier level you want your project to be. First, a quick word about the Tier levels:

Tier 1 MS through WriteRAP server
-Authors write in Word but take advantage of server- based workflow with version control.
-By not using a WR template, authors can still use the server-based document-sharing tool without installing the Word plug in/tool bar.

Tier 2 Basic MS Template
-Elements are represented manuscript-style. The author is able to identify levels of heads, text, feature material, and key terms.
-Each element is easily identified and distinguished through different fonts, point sizes, color, etc.
-There is no page presentation or set trim size.

Tier 3 Advanced MS Template
-Correct trim size is implemented.
-Template includes visual representations of feature elements, marginalia, and chapter/part openers.
-Elements are not in place on the page but are displayed graphically within the text stream.
-Picture placeholders and callouts can be used.

Tier 4 Standard Page Representation
-Correct trim size is implemented.
-Template includes visual representations of all elements in place on the page.
-Page representation is close but not exact.
-Provides a very good representation of the final product.

Tier 5 Complete Page Representation
-Correct trim size is implemented.
-Template includes visual representations of all elements in place on the page.
-Page representation is exact.
-End product can be printed directly to PDF without going to composition.

That sounds like a lot of information! How do you sift through all of that to really decide what Tier level to use for your WriteRAP project? The best course of action is to consider a few questions about your project:

  • Is this a first edition, or a revision? If a revision, is it a light revision or a sweeping revision?
  • Is the author writing in WriteRAP? Does the author feel comfortable working with new tools and technology?
  • Is accurate page representation important during the authoring phase?
  • Are you planning on sending the project into composition software?

If the answers to these questions highlight a project for which there is light revision, the author is not interested or able to write in a structured environment, and accurate page representation in the manuscript phase is not important, then you’d probably want to consider a Tier 1 or Tier 2 project.

For a Tier 1 project, you’re really only interested in version control of your files, by using WriteRAP as a document exchange. Tier 1 projects do not employ a template at all. For a Tier 2 project, you’re providing some structure for the author, but the template they work with truly resembles a standard manuscript.

If page representation is a bit more important, or if you have issues such as length control or even just giving your author a look at their features in the manuscript stage, you might consider a Tier 3 project. Tier 3 introduces the features set into the manuscript, but doesn’t focus as much on page layout. Tier 3 is good for managing length because it allows you to preview how many pages a chapter will be by including representations of all features. It does not, however, focus on layout and accurate page representation.

If the final representation of the pages is very important, Tier 4 is for you. Tier 4 introduces not only the features of the chapters, but also the layout. Tier 4 is good for revisions with length issues, for art-intensive manuscripts, and for manuscripts where it’s important to see features on the same pages in which they’re called out in the text flow.

If you’re looking for a workflow that bypasses composition altogether, then you are looking for a Tier 5 project. Tier 5 Projects are primarily suitable for anything going direct-to-PDF, for any titles that are handled spread-by-spread, or any magazine-like HE titles that are handled the same way. In a Tier 5 project, al composition and layout is done in the WriteRAP template/environment.

Hopefully, this information can help you make the right decision for your project heading into WriteRAP!

Tuesday, September 14, 2010

WriteRAP Documentation: The Help Button

Don't forget about the documentation link now on WriteRAP. To get there, log on to WriteRAP, click the Help button, and click the Additional WriteRAP Documentation link.

Thursday, September 9, 2010

It’s Time to Get Some Training!

As we near the release of our full suite of revised training courses, it seems like a good time to review the various training paths for WriteRAP users, both internal and external.

The first, and most important, step in setting up WriteRAP training is to identify some of the basic information about your training needs. You can do this by answering the following questions:

  • How many users—both authors and business unit team members—will need training?
  • Is this training for a particular project? If so, what is the project name? Is the project staged in WriteRAP already with at least one chapter uploaded?
  • What “tier” is the template?
  • Have the people who will be attending this customized course taken any WriteRAP training? If so, which courses?
  • Have the people who will be attending training been using WriteRAP?
  • Are the trainees Mac or PC users? A combination?
  • Will the trainees attending training be hands-on users of WriteRAP, or are they taking the customized course for more informational purposes?

    Once a list of training recipients is identified, the second step is to identify the skills needed for training. What does that mean? The courses being offered focus on specific skills-sets needed for working with WriteRAP. You can use the following list to determine what your project’s training needs are.

    The courses, and the skills they cover, look like this:

    Course: Getting Started
    * Login. Log out
    * Change/Recover Password
    Course: Document Management
    * Find Projects/Documents
    * Preview Documents
    * Download Documents
    * Upload Documents
    Course: Toolbar Basics
    * Open a WR Document and WriteRAP Toolbar
    * Apply/Remove Character Formatting
    * Apply/Remove Styles
    * Work with Basic Formatting
    Course: Boilerplates
    * Download/Open Boilerplates Library
    * Insert and Edit Boilerplates
    * Work with Common Boilerplates
    * Clean Up Styles
    Course: Basic Pagination
    * Reposition Boilerplates
    * Remove/Resize Boilerplates
    * Breaks (Convert section and Split/slash
    Course: Advanced Pagination
    * Direct to Print PDF
    * Inserting Images

    Once you have all of this information targeted, fill out a request for training by visiting the CMS Website here, and you will be contacted about setting up your training.

  • Tuesday, September 7, 2010

    Toolbars Beyond the WriteRAP Toolbar

    So your WriteRAP CMS team has been looking at some functionality to make applying styles for the author easier to use. The PTG group had developed a toolbar for their authors to add to their documents to, essentially, make "human" the paragraph styles.

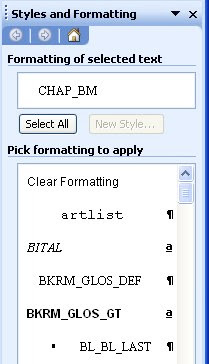
    Basically in WriteRAP, you have two methods to style paragraphs: the Styles and Formatting palette and an optional toolbar. Figures will better illustrate. Here is the Styles and Formatting palette:


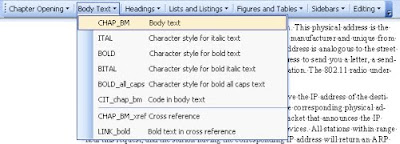
    Here is the optional toolbar:


    As you can see, a big difference exists between the two. The Styles and Formatting palette is the common and expected technique. Unfortunately, it lacks an ability to display meaningful names about the style. CHAP_BM is simply that. But the optional toolbar provide an ability to show the style name, CHAP_BM, while also providing a human-readable form: Body text.

    Currently, your CMS team is experimenting with creating the toolbars and working on methods to include the user-friendly toolbars with your templates. Look for future communications and posts!

    Thursday, September 2, 2010

    WriteRAP Enhancements?

    Your WriteRAP team is considering possible enhancements for the next planned release in December 2010. Anything you've been thinking would be awesome to have in WriteRAP? We're listening...just email us.

    Tuesday, August 31, 2010

    Penguin CORE


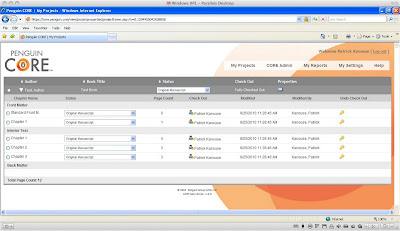
    Several members of your WriteRAP team are today in sessions discussing Penguin CORE, which was developed by Penguin using WriteRAP as a starting point, though it is significantly different in its code base at this time.

    CORE was designed to solve a different problem than WriteRAP, nonetheless, you WriteRAP team is talking with the CORE team about the gaps between the systems, how difficult those may be to bridge, and possible solutions and development paths. More details to come, so please be patient because there's a lot to discuss.

    Thursday, August 26, 2010

    Hey! My Author Is Using Word 2008 for the Mac

    The WriteRAP system requirements are:

    Macintosh

    Mac OS X version 10.2.8 or later

    Safari 2 or later

    Flash Player 8 or later

    Minimum screen resolution of 800x600

    Active Internet connection

    Microsoft Word 2004

    WriteRAP Add-In for Word


    Windows

    Windows 2000, ME, XP, Vista, or 7

    Internet Explorer 5.5 or later

    Flash Player 8 or later

    Minimum screen resolution of 800x600

    Active Internet connection

    Microsoft Word 2000, XP 2002, 2003, 2007, or 2010

    WriteRAP Add-In for Word


    Notice the gap there? Word 2008 for the Mac is not supported by the WriteRAP system. So what's the deal? Why is that?


    First and foremost, you should understand that WriteRAP makes extensive use of VBA. Microsoft decided to remove VBA support from the Word 2008 version. The good news is that VBA support will be re-introduced in the upcoming Word release for Mac. But that leaves Word 2008 out in the cold. Almost.

    Word 2008 can be used in an "offline" workflow, by which I mean it can be used outside the normal WriteRAP processes. This entails, of course, several caveats:

    • The WriteRAP toolbar will not be available to the user.

    • The user is much freer to apply incorrect styles, add styles, etc., that are normally locked down for most users.
    However, a user can still
    • Attach the template
    • Insert boilerplates using a workaround process
    The point is that if you have an author working in Word 2008, you are not up a creek without a paddle. An option still exists. However, please speak to you CMS rep or super user to get the full details and discuss thoroughly the implications and definitely bring it up at the launch meeting.

    Tuesday, August 24, 2010

    Why Do We Call Them Boilerplates?

    One of the most powerful and useful WriteRAP features is boilerplates. What are boilerplates? They are reusable, pre-styled design elements: Figures with captions, chapter openers, etc.

    Here is a chapter opener boilerplate:

    Here is a set of figures in a row boilerplate:
    The dummy text is simply replaced with the real text the author wants to place. The intention is to make the creation of these repeatable items easy. The author simply inserts a boilerplate into a document using the Boilerplates button on the WriteRAP toolbar.

    But why, on earth, do we call them boilerplates? Boilerplate is a term from the 19th Century and has many uses, most of them mentioned in this Wikipedia article.

    Thursday, August 19, 2010

    Installing WriteRAP on Word 2010 for Windows

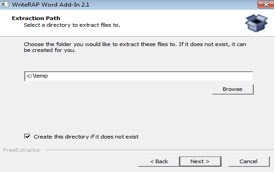
    Start the installation by selecting Windows: WriteRAP Add-Inn from WR Help page and follow the following steps:

    1. Click Run.

    2. Click Yes.

    3. Click Next.
    4. Click Next.
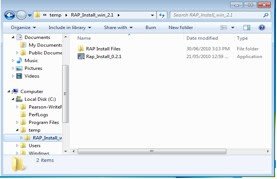
    5. If the Installation Window did not open automatically, browse to C:/temp folder and double click Rap_Install_02.1.
    6. Click Yes.
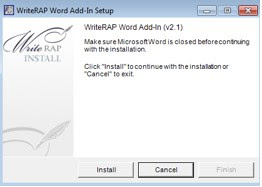
    7. Click Install.
    8. Click Finish.

    After the installation is completed, the WriteRAP toolbar should appear in the Add-Ins tab of any Word document that is open. If the Add-Ins tab does not appear, then you have to do the following. Note that this would be a one time adjustment of your toobar.

    In order to add or attach templates, you need access to the Developer tab in the ribbon. To have the Developer ribbon appear, follow these steps:

    1. On your toolbar go to: Customize Quick Access Toolbar > Quick Access Toolbar > Choose Commands From > Popular Commands > Developer tab.

    2. Click OK.

    This gives you access to the Templates and Add-Ins dialog. It’s similar to the one in Word 2003. To add a template (this example uses the WriteRAP toolbar template), follow these steps:

    1. In Word 2010, click the Developer tab.

    2. Click Document Template. The Templates and Add-Ins dialog appears.

    3. Click Add. If you placed it in the location indicated previously, your template should appear in the default folder that opens.

    4. Double-click the template that you wish to add (rapToolbar_win_2.1.dot). It should now appear in the Global Templates and Add-ins pane with a check mark next to it.

    5. Click OK.

    Tuesday, August 17, 2010

    Vendors!

    Who has been certified, and who hasn't? What have they been certified for?

    First, a few words of caution: Part of WriteRAP is about experience - and we are all gaining experience, even or especially the vendors. The best-trained vendors still may need help when they first start live work in WriteRAP, or take on a task or workflow they have not yet encountered.

    Also, projects are unique, and WriteRAP is very flexible, so be sure your vendor is clear about expectations for your particular project.


    VendorExtractions Styling Template
    Build
    Project
    Mgmt
    Overseas/
    Domestic
    Partner

    Aptarayesyesyesyes

    GEX, Inc.yesyesyesyes

    IntegrayesyesyesyesBookmasters,
    Elm Street

    Laserwordsyesyes yesPine Tree

    Macmillan Publishing
    Solutions (MPS)
    yesyesyesyes

    Premedia Global (PMG)yesyesyesyesGGS, Prepress

    S4Carlisleyesyesyesyes

    Bookmasters yesIntegra

    Carlisle yesS4

    GGS yesPMG

    Pine Tree yesLaserwords

    Prepress yesPMG

    Progressive yesIntegra


    Who is being certified?
    Currently training in template building: Progressive, Juve
    Scheduled for all processes: Juve, Element

    Thursday, August 12, 2010

    Adding and Attaching Templates in Word 2007

    Have authors working in Word 2007?

    The steps listed in this document work with the cistm0407.dot template

    Place your templates in the following location (on your C: drive or main hard drive):

    · For Windows XP: Documents and Settings/username/Application Data/Microsoft/Templates.

    · For Windows Vista: Users/username/AppData/Roaming/Microsoft/Templates.

    Windows hides some of these folders by default. If you can’t see one of the folders listed, follow these steps:

    1. From your current Windows Explorer window, choose Tools > Folder Options.

    2. Click the View tab.

    3. In the Advanced Settings pane, select the radio button next to Show Hidden Files and Folders.

    4. Click OK.

    In order to add or attach templates, you need access to the Developer tab in the ribbon. If it does not appear, follow these steps:

    1. In Word 2007, choose Office (the office symbol in the top-left corner) > Word Options.

    2. Click Popular.

    3. Click Show Developer Tab in the Ribbon.

    4. Click OK.

    This gives you access to the Templates and Add-Ins dialog. It’s similar to the one in Word 2003. To add a template, follow these steps:

    1. In Word 2007, click the Developer tab.

    2. Click Document Template. The Templates and Add-Ins dialog appears.

    3. Click Add. If you placed it in the location indicated previously, your template should appear in the default folder that opens.

    4. Double-click the rapToolbar_win-2.1 template that you wish to add. It should now appear in the Global Templates and Add-ins pane with a check mark next to it.

    5. Click OK.

    To open a new document from a template, follow these steps:

    1. In Word 2007, choose Office (the office symbol in the top-left corner) > New. The New Document dialog appears.

    2. In the Templates pane, click My Templates. The New dialog appears. If you placed the template in the location indicated previously, your template should appear in this dialog.

    3. Double-click the rapToolbar_win-2.1 template.

    4. Make sure the desired template is checked in the Global Templates and Add-ins pane.

    5. Click OK.

    To attach a template to an existing document, follow these steps:

    1. Open your existing Word document.

    2. Click the Developer tab.

    3. Click Document Template. The Templates and Add-Ins dialog appears.

    4. Click Attach. If you placed it in the location indicated previously, your template should appear in the default folder that opens.

    5. Double-click the rapToolbar_win-2.1 template.

    6. Make sure Automatically Update Document Styles is checked.

    7. Make sure the desired template is checked in the Global Templates and Add-ins pane.

    8. Click OK.