
Tuesday, August 10, 2010
WriteRAP August 2010 Release
The August WriteRAP Release was applied on 8/3/2010. This minor update features WriteRAP enhancements and bug fixes including limiting the QuickText project import list to the My Projects list, providing system update notices on the Home page, providing multiple project archiving and delivery capabilities, improving visibility on the Manage Boilerplates screen, providing the capability to add multiple team members to projects at the same time, providing new documentation on the Additional Documentation screen, and adding Boxes to the WriteRAP toolbar. Please review the release notes (or ask a your Pearson contact for a copy) for further details of these updates and fixes as well as a list of known open issues.
Thursday, August 5, 2010
Accessing Template Toolbars in Word 2007
The previous instructions ensure that the template is properly added to Word and attached to your document. Once they are completed, the following steps will enable you to access the template toolbars:
1. Make sure your template is added, attached, and checked in the Global Templates and Add-ins pane, per the previous instructions.
A new tab called Add-Ins should appear in the Ribbon, all the way to the right.
2. Click the Add-Ins tab.
3. The template toolbar appears. It is fully functional.
4. To apply a paragraph style from the toolbar, place your cursor in the paragraph you wish to style and choose the style from the appropriate menu.
For example, if you want to style a heading Section, choose Headings > Section Style.
See the standard authoring documentation for a description of the styles and detailed styling instructions.
Tuesday, August 3, 2010
Word 2007 Tips to Help with Styling Documents
You can configure Word 2007 to show you more styling information by default, much as Word 2003 did. Users accustomed to Word 2003 will find these tips particularly helpful.
To display Style box in your Quick Access Toolbar, follow these steps:
1. Click the downward pointing arrow to the right of the Quick Access Toolbar (which is in the top-left corner of the screen).
2. Choose More Commands. The Word Options dialog opens.
3. In the left pane, scroll down and select Style (not Styles).
4. Click Add, and click OK.
5. A box appears that shows the style of whatever text you have selected. You can also change a paragraph style by typing its name in this box. It functions exactly like using the toolbar, except you must know the name of the style you want to use and type it in the Style box.
For example, if you want to change the style of a paragraph to Body, place your cursor anywhere in that paragraph, then double-click in the Style box and type Body. Hit Enter, and the paragraph style changes to Body.
To see nonprinting characters on screen, follow these steps:
1. Click the Office button (in the very top-left corner), and click Word Options (bottom right).
2. Click the Display tab.
3. Under Always Show These Formatting Marks Onscreen, check Show All Formatting Marks (or select only the ones you want to see).
4. Click OK.
To have paragraph styles displayed along the left side of your screen (in Draft and Outline views only), follow these steps:
1. Click the Office button (in the very top-left corner), and click Word Options (bottom right).
2. Click the Advanced tab.
3. Under Display, set the Style Area Pane Width in Draft and Outline Views to .5”.
Thursday, July 29, 2010
I Want My Rounded Boxes
Word is not a paging program, but working with it can give you an appreciation for just how much can be reproduced in Word: tinted boxes, vertical type, custom borders, and other graphically pleasing touches that make a book attractive.
You can get almost anything reproduced in Word. The question is, Should you?
Some reasons for caution:
- Word elements are not as easy to control as elements in a paging program. Adding tints or borders because of their graphical appeal, rather than their pedagogical necessity, can mean more elements to juggle on a page than you really need to.
- Word files are prone to corruption, especially from drawing objects. Drawing objects include boxes and shapes. While many of these are necessary for features and image placeholders, shapes that are there for aesthetic purposes can be eliminated to simplify the Word file and minimize the chance of Word corruption.
The goal in WriteRAP is to have a viable representation of the finished page, and to ensure elements take up the correct amount of room. It is more important that a 24x12 box take up 24x12 than that its corners are rounded, or that its tint exactly matches the Quark or InDesign file.
When you look at your design, look for things that are pedagogically significant to be reproduced: examples, for instance, might have a vertical or end rule that is used to separate the example from the body text. This is a meaningful graphical element that needs to be reproduced. However, if these examples are tinted in addition, you probably don't need that as well, and not having the tint will mean easier handling of your content.
You might wonder, if you have a box anyway, why can't it just have rounded corners? And the answer is that in Word, you can't just make the corners rounded - you have to add a drawing object and keep it grouped or anchored in your text. And that's when things can get messy.
If you are going direct to PDF, it may be worth a little extra work to get the graphic touches that you want. If you can alter your design to minimize these items, that's great, but when you can't, go ahead and use rounded boxes. If they make the file harder to work with, you can work with simpler elements during editing and have the vendor swap in the complicated version as part of the finalization process.
Tuesday, July 27, 2010
Word Tips 2
Quick Case Changes
Did you know you can highlight vertically in Word?
If you want to highlight vertically - say you have a vertical row of equation numbers hanging to the right of your equations, or line numbers hanging off to the left of your reading or computer code - and you want to apply the same character style for all of them, this will be useful. On Windows, hold down Ctrl-Alt-Shift, or on Mac hold down Ctrl-Command-Shift [Ctrl-Apple-Shift], and start dragging your cursor down. Once you've made your selection, apply your character style.


You can toggle through cases - UPPER CASE, lower case, Sentence case, and Title Case - by pressing Shift-F3 in Windows and Shift-FN-F3 on Mac.
This is a fun one for Word trivia buffs - all of whom probably need intensive therapy.
Better Rulers in Tables
Speaking of the Alt key (or option key, on Mac): You know how annoying it is trying to adjust the width of table columns by dragging the vertical rule? Hold down the Alt key to change this uninformative ruler:
to this much more interesting one:
Thursday, July 22, 2010
Can I Use My Old Extraction?
Most extractions can be used or repurposed for use with WriteRAP.
The WriteRAP workflow includes a Quark plug-in called BatchXPort Pro (soon to be an InDesign add-in called BatchXSLT). This software is used to extract both the design (for the template) and contents from the chapter. It is absolutely required that a template created from a Quark or InDesign design file must use this software.
But for content - the chapter files you are actually working with - most extractions can be used or reworked for use in WriteRAP.
Traditional extractions preserve ETM (or XID) style names, include XML tags, and normally drop art and features to the end of the file. WriteRAP extractions also preserve style names, but they contain no XML tags, and they normally have the photos and features inline. Macros are provided to vendors that will remove XML tags from traditional extractions, and, if style names exist, will clean them up. Features and photos are moved into place during the layout of a chapter.
An extraction that is provided as raw text with no styles can still be used - but the vendor will need to style all the content. In this case, you might want to get a quote from the vendor to determine which approach will be less expensive - generally, simpler books can be styled quickly and easily, and with no more effort than creating a new extraction. But for a complex book with a lot of styles, the vendor may be able to save some time by doing a new extraction.
Tuesday, July 20, 2010
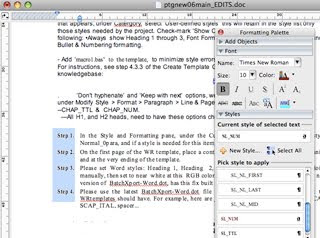
Too Many Styles!
So you're looking at a WriteRAP project and all those ETM styles. And you're wondering how you can get your author to see this new tools as a benefit.
Here are some strategies to consider for protecting your author from the abundance of styles that are a necessary part of ETM.
Request a trimmed-down style list. Styles can exist in a WriteRAP document without being seen by the author. What styles does the author really need? Probably body copy, and a few lists. Maybe feature material and captions. They probably don't need every iteration of text that can appear in a feature box - the copyeditor or markup person will go in and apply the full style set.
Use boilerplates. An author almost doesn't have to think about styles at all if they can place pre-formatted copy and just type over what's there.
How about those hot keys? You can request hot keys in WriteRAP - alt-P for body (paragraph) text, for example, or shift-alt-N for numbered lists. If there is a lot of repeat styling you want your author to do, consider asking for hot keys.
And don't forget about the stylemarked document! The sampler should be a good guide to anyone working in the project. You don't have to know what EXM_NL means to apply the style, if you have the sampler in front of you.
Subscribe to:
Posts (Atom)

